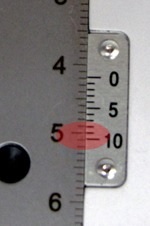
The vernier caliper is a tool that is used in engineering industries for accurate measurement. Its main uses are due to its accuracy and reliable features, and it provides features for measuring the value of inner, external, and depth values for minute levels. In this post, we will cover details for Vernier scale reading and different parameters.
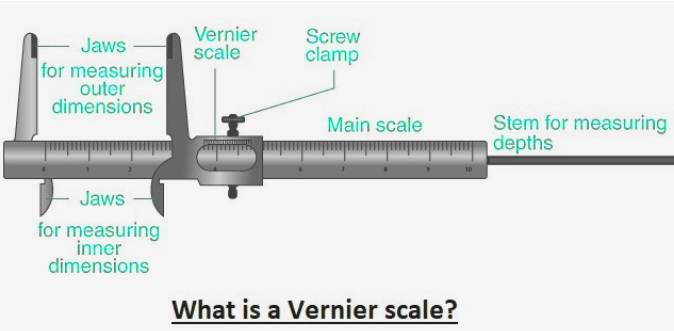
What is a Vernier scale?
- The vernier scale is used in connection with measuring devices like calipers, micrometers, and height gauges.
- It moves over the main scale and measures the reading to the smallest division on the main scale.
- The common nearest 0.02mm reading for vernier scale.
- The vernier is a scale that is used as a replacement of single measured value pointer and comes with 10 divisions at equal values to 9 divisions on main scale.
- Interpolated reading is measured with observation of the vernier scale coincident with graduation on the main scale and is easy to get as compared to visual values between two points.
- Vernier calipers are used in industries to provide 0.01 mm, or one thousandth of an inch. It also comes in different sizes that have a measuring capacity of about 72 in.
Understanding Vernier Caliper
Vernier calipers are highly accurate instruments that are used for measuring internal and external dimension values properly. It measures values in centimeter units and is accurate up to two decimal places, like 2.24cm.
Vernier calipers come with different scales that show different parameters for values.
Main Scale:
- • The main scale is called the fixed scale and exists on the caliper, and it has millimeter grades and inches. Each division on the main scale denotes a certain measurement unit and provides numbers of value measured.
Vernier Scale:
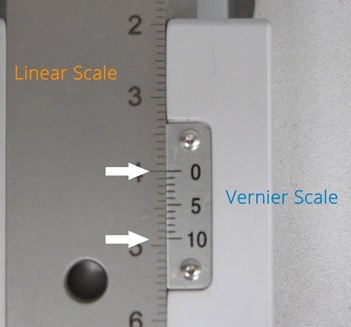
- The vernier scale is a secondary scale that moves in parallel to the main scale. It comes with divisions in series that are small compared to the main scale.
- The zero point on the vernier scale is related to a certain point on the main scale that shows alignment at the time of measurement.
Alignment:
- For reading the vernier scale, set the zero point of the vernier scale to the closest point on the main scale. Check the first line on the vernier scale that is configured with the line on the main scale. It shows the fractional part of values.
Measurement Reading Method for Vernier Caliper
For reading measurements on a vernier caliper in the proper way, there is necessary to note that the vernier caliper resulted reading of 13.42 mm, which shows
- Main scale showing main numbers and one decimal place reading 12mm, where 1 is the main value and 0.3 is one decimal place
- The vernier scale helps 2nd decimal place for reading that is 21 divisions.
- We will follow these points for measuring readings.
- To get the main scale reading, follow the above image; 13mm is left to zero on the vernier scale. So the main scale reading is 13mm.
- For getting a vernier scale reading, note where the alignment of the scale line of the main scale and the vernier scale is.
- The alignment is on 21, so the vernier scale reading is 21 * 0.02 = 0.42 mm.
- To get the final value, add the main scale reading to the vernier scale reading, which is 13 mm + 0.42mm = 13.42mm.
- Output reading = Main scale reading + Vernier scale reading
Mistakes for Reading Vernier Caliper Measurements
Misalignment:
- The main error is the improper alignment of the zero point of the vernier scale to the main scale. To solve it, make proper alignment through proper alignment before measuring values. Make proper alignment for zero point with the main scale.
Parallax Error:
- Taking value from the angle causes parallel error, so check the vernier scale and the main scale directly over to avoid parallel errors. Set your line of sight at 90 degrees to the caliper.
Decimal Point Misinterpretation:
- There is another error: the misinterpretation of the decimal point on the vernier scale causes faults in measured values. To solve this error, check the position of the decimal point on the vernier scale. Make sure that it is configured with a main scale division between two divisions
Vernier Scale Orientation:
- Reading the vernier scale upside down or in any other wrong direction. So check the vernier scale that is accurately positioned. The scale slides over the main scale, and the numbers and divisions are easy to read.
Jaw Misalignment:
- • The jaws of the vernier caliper are not in accurate alignment for measuring and cause wrong values.
- So make sure jaws are clean and properly aligned. The alignment has an effect on accuracy values.
Neglecting Zero Error:
- • Do not ignore zero error for calibration of the Vernier caliper. Regularly check zero error by closing jaws without any particle in between. The zero on the vernier scale needs to align in the proper way with the zero on the main scale. If you see deviation, note zero error and set values accordingly.
What is least count?
- The difference between one main scale division and the value of one vernier scale division is called the least count of the vernier, which is also called the vernier constant.
Zero error
- Zero error is a condition where the measuring tool provides a reading when there is no reading. For vernier calipers, it occurs when zero on the main scale does not align with the zero on the vernier scale. The zero error is of two types: if the scale is towards a number greater than 0, it is positive, and in other conditions is negative. These techniques are used for a vernier scale with zero error through the use of a formula.
Actual reading = main scale + vernier scale − (zero error).
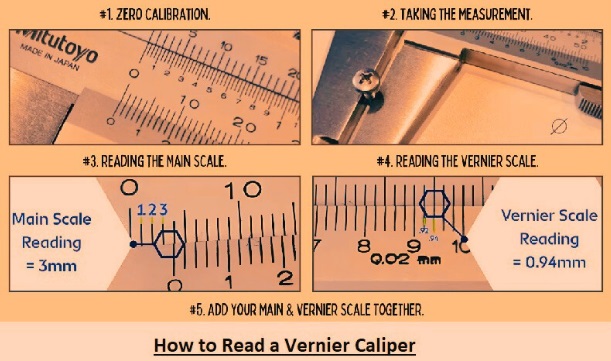
How to Read a Vernier Caliper
For reading the vernier caliper, follow these points:
FAQs.
What is a vernier scale used for?
- Use of a vernier scale is shown on a vernier caliper that determines the inner and external diameter value of an object. The vernier scale has a design so it defines a constant fraction of the fixed main scale.
What is the formula for the vernier scale?
- For the vernier caliper, its least count formula is shown below.
- Vernier caliper least count: smallest reading of main scale/number of divisions of vernier scale =1 mm ÷ 10 divisions = 0.1 mm.
What is the difference between the vernier scale and the main scale?
- The smallest value on the main scale is 0.1cm. The vernier scale reads to 0.05mm. Using both scales, width can read close to 0.005 cm (or 0.05 mm).
How is accuracy provided by Vernier?
- Then the main scale and the vernier scale give high accuracy. As a result, vernier calipers provide an accuracy value of about 0.02mm.
- Micrometers are used to get accurate values with high accuracy.
What is the principle of a vernier scale?
- The vernier calipers operated on the alignment of numerical lines, providing a correct reading for measurements. The vernier calipers come with two scales that align according to object size, which is put between two holders of the instrument.
